I therefore decided to build a passive ventilation system, i.e. one which works automatically and needs no intervention from us. There are no opening windows in the greenhouse, so fitting a pair of extractor fans high up on the rear wall was the plan.
There are already five low-level aluminium louvre vents provided along the front of the greenhouse from the time of its construction, through which fresh air can be drawn in as the hot air is expelled.
I suppose I could have used kitchen-type extractor fans powered from the mains supply, but I've four 108 Wp solar panels in the shed simply gathering dust at present.
To first confirm that the solar option was feasible, I dug one panel out, gave it a wipe clean and hooked up a 24V dc fan to the panel connector. Even on an overcast morning the fan started to run immediately, and checking with my multimeter showed that the load voltage of the panel under those conditions was 20-24V (open circuit was ~34V).
So I decided to refit one of the solar panels to the greenhouse, but this time to one side of the roof which will also form a covered porch over the door.
I still had the multi-panel wooden frame from when I removed the panels, so I cut off one panel-sized section and used that as the basis for the construction. It only took the addition of a couple of knee braces back to the greenhouse structure and a fresh coat of paint to finish it off.
 |
| panel support frame over the greenhouse door ... |
I could have simply connected both fans directly to the solar panel, in parallel, and the system would have been self-regulating to a degree, i.e. the brighter the sun, the more current available and the more air the fans can expel, and the greenhouse only gets too warm on bright summer days.
However, we get bright days at other times of the year too, and in any event a direct solar panel connection would mean that the fans would be running continuously from dawn to dusk, 365 days a year, and these are certainly not industrial-quality fans so I wouldn't expect the bearings to last long if they were intended to operate for >4,000 hours per year.
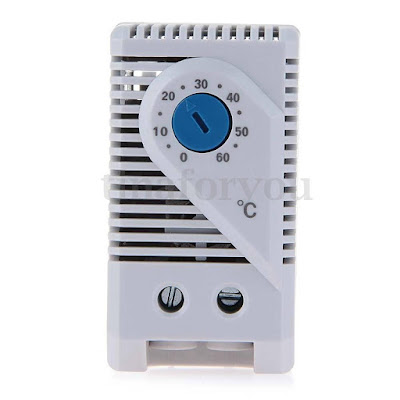
It seems evident that thermostatic control is required if the fans are only to kick-in when they're needed. But so far I've struggled to find a suitable simple old-school bimetallic unit with normally-open contacts and a wide operating temperature range from a UK or EU seller. Modern domestic units tend to be at least partly electronic, and need a permanent power supply which defeats the object of an off-grid ventilation system.
However, I did manage to source a purely mechanical device on eBay from China and for only £3, but I know from experience it can take up to 6 weeks for items from China to be delivered.
 |
| the cooling thermostat from China ... |
So as an interim measure, I've found a couple of Chinese single-temperature thermal switches, available in a range of preset temperatures and with a choice of contact configurations, from a seller in the Netherlands.
Anyway, I ordered two of these cheap thermal switches, one preset for 30 degrees and the other for 35 degrees, with the intention of testing them before deciding which one to use. These are normally-open bimetallic switches, and when the set temperature is reached then the contacts close and make the circuit - this is the opposite of a domestic heating thermostat in which the contacts are normally closed and upon reaching the set temperature the contacts open and the circuit is broken. At the time of writing, I'm still awaiting delivery of these switches.
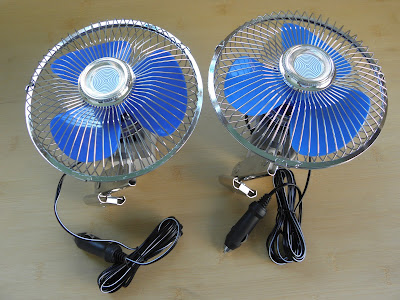
I also ordered two new 24V fans, of exactly the same model as the one I already had. I'll keep the old one as a spare.
 |
| the two new fans as delivered ... |
These are 6" plastic-bladed oscillating fans for use in truck cabs, supposedly to help keep the drivers cool, although I'd expect modern trucks to be provided with decent air conditioning. Two 9" square aluminium vent louvres completed the project procurement activities ...
Back to the works. The solar panel was lifted into position and secured with screws around the aluminium frame. A cable was routed inside the greenhouse from the solar panel connector to a terminal box with a voltmeter and ammeter.
 |
| panel fitted in the frame .... |
The 15 mm thick fenceboards forming the rear walls of the greenhouse then needed cutting for the fan outlets, for which I used my trepanning tool in an electric drill.
 |
| hole cutter in the portable drill ... |
I set up the tool to cut circles of 160 mm diameter, larger than the fan blade sweep (145 mm) but smaller than the inside diameter of the flange on the fixed fan guard. I'd first cut circles out of the aluminium foil which I fitted last year to increase the lighting by reflecting the sun back into the greenhouse.
 |
| hole made through the greenhouse wall .... |
The vent louvres were then fitted to the outside of the wall.
 |
| vent grille from the outside ... |
 |
| and from the inside ... |
When the new fans arrived, I disconnected the mounting brackets and oscillating drive gear etc, and also removed the outer blade mesh guards and set them aside, since they're not required for this installation. I drilled through each of the inner guard flanges in three places to accept small screws for mounting the fans directly to the inside wall of the greenhouse.
 |
| 3mm diameter hole in the guard flange ... |
I also added an inline on-off switch to the cables of each fan, so that either or both can be easily isolated if required.
 |
| fan mounted ... |
 |
| you can see the two fans high up on the back wall ... |
With the installation works complete apart from the thermostatic control, it was time for initial system performance testing !
In the early afternoon of a sunny March day, I wired the fans to be permanently on and then used my handheld anemometer to record the airspeed exiting the fans. The greenhouse door was fully closed during the testing.
I held the anemometer close to the vent outside the greenhouse and recorded a mean airspeed at the vent grilles of ~1.5 m/s - it's difficult to get an accurate reading and the grille itself provides a reduction in area that will tend to show the airspeed as being higher than coming directly off the fan, so this value is on the low, conservative, side.
Using the fan blade tip diameter of 145 mm and subtracting the area of the 32 mm diameter hub at the centre, which does no work at all on the air, gives an effective blade swept area of 0.01571 m2.
Therefore, using the mean measured airspeeds taken outside the vent grille, it's a simple calculation to estimate the expelled airflow at 85 m3/h per fan, i.e. a total of 170 m3/h (~100 cfm) for the pair.
The outside airspeeds are used rather than at the fan suction on the inside because, looking at the fan blade profile, it's more of a 'mixed' fan design, i.e. a mixture of radial and axial flows, and the radial components of flow are impossible to measure with our simple anemometer, but the way the fan is mounted and confined within the cowl formed by the aperture in the greenhouse wall means that all the airflow through the fan must pass out through the vent grille - it has nowhere else to go.
The greenhouse internal volume is 13.6 m3, and so the ventilation system will provide around 12.5 air changes per hour (ach). In the summer, when the sun is higher and brighter, we can expect an increase in performance.
Although not at all relevant to our own greenhouse ventilation requirement which is primarily to reduce the internal temperature, here's a table from the Chartered Institute of Building Services Engineers (CIBSE) guide which gives recommendations for the ventilation requirements for different types of buildings.
It's also possible to estimate the heat load removed from the greenhouse for a given internal temperature, but it's a more involved calculation and I can't be bothered to do that at the minute...
I'll post an update after I receive the thermostat.
Update 23-Mar-17
I didn't have to wait as long as I thought for the thermostat to arrive from China. I hooked it up temporarily and turned the setting dial down to around 20 degrees, and it clicked in and started the fans.
So the whole system seems to be working fine, I just need to find a permanent home for the thermostat and make a proper fixing bracket for it (it's actually a rack mounted unit, presumably for use within computer server rooms etc).
 |
| on test, switching on at around 20 degrees ... |
In the summer, I'll play around with the setting temperature to get the fans to come on when it really heats up in the greenhouse.

No comments:
Post a Comment